Monday, December 15, 2014

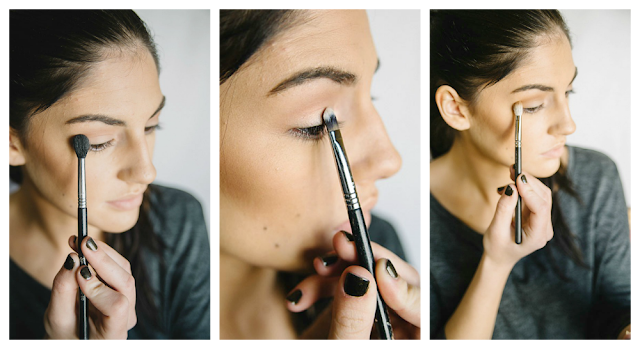
Tutorial for my Gals with Glasses!

I always get asked this one question: How do you wear makeup with glasses without looking crasssy?
I'm honestly not the one to ask this question because if I have my glasses on, my makeup is gone. If I'm wearing my 10 year old glasses theres no making me look presentable. Makeup with glasses is honestly tough. So, I did some research and talked w my girl Gabi-- a fellow glasses wearer-- and we came up with a basic, everyday, makeup look. Also, some tips as well!

makeup, tutorial, glasses, liner, warbyparker, tips, tricks, blog, bblog, beauty, makeuptutorial,

Wednesday, December 10, 2014

How To: Natural Beach Waves


Am I the only one who loves messy hair?
Messy hair is just so effortless and IN thank the lord. Because I don't know what in the world I would do if I had to straighten my hair everyday like high school. If you aren't born with natural waves heres a quick tutorial on how to get them! 

Tuesday, December 9, 2014

Holiday Gift Guide || Giveaway!


giveaway, makeup, makeup brushes, iPhone, mophie, urban outfitters, camera, lens, curling wand, nume, blanket,

Mophie Battery Pack Phone Case- $119 I literally would be so happy for this present. If you have an iPhone you know the battery friggin is the worst. My phone dies so fast all the time I am allllways charging it. This case is very durable and even better yet it charges your phone an extra 120%. Thats like all weekend without charging your phone. Or if your me maybe a whole day. Hahahah (I have issues)(Don't call cellphones anonymous)(I swear I can put it down)(Ok, the first process of getting over an addiction, is admitting you have an addiction) Its a little pricey, but, like i said if you're a girl even teenage to older women because my moms phone is always dead too! Anyone can get amazing use out of this!

Sigma Makeup Brushes- $86 These makeup brushes are the bomb.com and every single girl, if they wear makeup which most do, needs makeup brushes, even if they don't have any. So this would be the perfect option! They last a leap year and are such great quality. If you use the code 'dec2014' you can get 10% off and also free shipping over $50!


Monday, December 8, 2014

Same lips, Diff chicks. #winteredition


Is it just me or is buying lipstick really hard? Its like a boxa' chocolate.. Ya never know what chur gonna get. Literally. The color it could be in the tube could be totally different than what it is on your lips. AND EVEN THE CRAZIER THING-- a lot of lipsticks look different on different skin tones. One of my favoriteeeeee bloggers did a post a while back check them out here. And I WAS OBSESSED, so I thought why not put my own spin on it! But, how do you know if you should take the leap and buy the lipstick? Cause, theres a lot of different ways it could turn out. But, I am here to help you. I thought I would put together some of my favorite fall lipsticks and then you can see what exactly they look like on different skin types, hair colors, eye colors, the whole shebang. 


Apparently, Russian Red wins! I loveeee the timeless look of a red lip. This lipstick is an amazing red especially because its blue based! Have you ever noticed when you wear red lips you feel like your teeth look yellow? With this lip that won't be the case! Thats because you're getting a warm based red, not a cool tone aka blue;) 

I hope this helped you on your fall and winter lipstick search! Let me know what your favorite color was in the comments! What do you usually go for? A red lip? A purple? Nude? Talk to you soon!

Thursday, December 4, 2014

Get The Look: Sarah Hyland Makeup!


fashion, blog, makeup, hair, tutorial, sarah, hyland, blogger, fblogger, bblogger, lorac,
Hiii everyone!
Today is mine and Kylas last Get the Look post on Sarah Hyland! I could shed a brief tear. Heheh. But, I saved my best post for last... Check out her makeup.. WHAT A BABE. Why is everyone so obsessed with Kylie Jenner when theres Sarah Hyland? Like she does a brown lip too? I don't get it....  Sarah always wears a pretty smokey eye with a brownish matte lip. She goes from grey smokey eyes to brown and is always very luminous! Her skin always looks amazing and has the most perfect glow. Keep reading on to find out more about this beaut and how to recreate it! AND BEWARE OF THE BROWS! Hahahhaha we filled them in to be thick like hers and they look a bit much but I promise by the end it looks perfect!

fashion, blog, makeup, hair, tutorial, sarah, hyland, blogger, fblogger, bblogger, lorac,

fashion, blog, makeup, hair, tutorial, sarah, hyland, blogger, fblogger, bblogger, lorac,
So first we did our foundation/contour routine which you can find here and highlighted with Nars Albatross. Then filled in her brows hehe.  Then I took my Lorac Pro 2 Palette and took Cool Grey on a crease brush and focused it in windshield wipers into her crease. Then with a bigger brush blended it all out. Then we took Chrome and patted it onto the lid. 
fashion, blog, makeup, hair, tutorial, sarah, hyland, blogger, fblogger, bblogger, lorac,
After that, we took, cool gray and focused this on the lower lash line to smoke it out a bit. Make sure to blend this as well! Then took Snow on her inner corners and right on the brow bone to lighten things up a bit! To finish, on her lips we used Wet and Wilds 'Bare it All'. I liked this color, its not turning up as brown as it was on camera. But for more of a brown lip, I would choose 'Gingerly' by Mac. 

fashion, blog, makeup, hair, tutorial, sarah, hyland, blogger, fblogger, bblogger, lorac,

And thats it! IM SO SAD THIS IS OUR LAST POST! Kyla is doing one of Sarahs casual outfits so go check that out and maybe you'll see us back with another collab soon;) We wiiiilllll seeeee. Comment below telling me your favorite style we did and what celeb we should do nexttttt. Talk to you guys soon! Photography by Sarah Kathryn |
fashion, blog, makeup, hair, tutorial, sarah, hyland, blogger, fblogger, bblogger, lorac,


Wednesday, December 3, 2014

Get The Look: Sarah Hyland Pt 2


I'm back today again with Kyla with our Sarah Hyland Get the Look series! If you didn't see our first posts, look here! Today, we are recreating her Emmys look ahhhhhh. TO DIE FOR. Sorry to anyone this might offend but I feel like this really put Sarah on the map of the celebs to watch. She looked so effortless, but, so chic. I fell in love instantly. Sooo today I am going to be replicating her bun while Kyla will be doing her outfit! 


First, take all of our hair on the top of your head and put it in a pony. Tease that entire pony.
Nowwwwwwww, I have a little cheat sheet. Take either a sock or one of these bad boys and put your hair into the hole. 
Now starting in the front, bring all the hair forward and then wrap all the hair around the donut/sock.
Secure the ends with a bobby pin under the bun. 
Take your hand with your fingers spread open into the front to loosen up the bun, to make it more messy.
AND thats it. 
Literally.
Im not lying.

Easy peasy lemon squeaky. A chic bun in like two seconds. Thats my favorite kinda bun. Go try this out on yourself! I bet you can do it in two minutes. I dare you! Now go check out Kylas outfit! I am soooooooo obsessed with this! Tell me you don't love this. I feel like it would be perfect for the holidays-- that red skirt? Ughh!


Photography as always by the lovely Sarah Bedzyk!
Check her out @ www.sarahkathrynphoto.com and like her on Facebook here.
I'm not giving away any clues but there may or may not be a makeup tutorial next! 

Keep your eyeeeez opennnn 0_o

Tuesday, December 2, 2014

Sarah Hyland: GET THE LOOK Pt. 1


sarah, hyland, outfit, hair, get, the, look,

Guess who's back, back, back, back again, gain, gain. IM BACK TODAY WITH ANOTHER GET THE LOOK SERIES! Hehee. These are my favorite! But, today with another blogger... Two times the fun! Now, me and Kyla over at Ky Marie C are recreating Sarah Hylands amazing style. Kyla is from New England and she has the cuteessst blog all about fashion, beauty & life in general! Lets just say, if you like my blog, you'll LOVE HER-- Go check her out! Sarah Hyland is the cutestttt little thing and her fashion sense is BOMB. I will be doing Sarahs hair/makeup for the next few days while, Kyla will be recreating some of her signature outfits! You don't want to miss this guys...... For the first post, I am going to be recreating Sarahs fishtailllllllllllll. Thank you so much Gabi for the heeeelp!! 

sarah, hyland, outfit, hair, get, the, look,

Can we please talk about how effortless this is? I would rock this anyday, anytime, anyplace. This hairstyle is perfect for loungin' around running some errands OR perfect for a fancier event like Sarah did and the best thing is it takes two seconds.

First, I would start out with second day curled hair (this helps with texture) or you can curl it with a wand then start. 


Sarah has crazy thick hair, so to replicate that start of with a volumizing mousse or give it a little tease.
|| Take all of your hair to one side and separate it like you would a braid but with two sections.
Then take the outermost piece of one section and cross it over, combining it to the other section.
Keep repeating this step all the way down. Going from one section to the other, making sure you keep it very tight!
Once you get to the bottom keeping about 4 inches out secure it with a clear elastic.
Now to the fun part- to make it more messy start pulling the braid strands out a little on each side. 
Also, pull out the pieces around your face and if necessary, recurl them.
I didn't do this step- but-- if you want her exact look, take a piece of the bottom hair thats out of the braid and wrap it around the elastic and tuck it in. This way the elastic won't be noticeable! 
AND VOILA! You're done! A simple easy hairstyle you can do anytime. Easy as that:)

Now go over and check out Kylas post all about Sarahs outfit! Comment on her page telling her I sent ya:) 


Photography as always by the lovely Sarah Bedzyk! 
Check her out @ www.sarahkathrynphoto.com and like her on Facebook here.
Illl talk to you guys soon with a new Get the Look posttttt eeeeek!


Sunday, November 23, 2014

Casual Thanksgivin' Outfit Ideas!

As you probably saw in my last post I am obsessed with Thanksgiving. I did a more classy outfit the other day which was GO FIGURE monochromatic. But, I thought I would give you a more relaxed just around the fam, colorful (to me) look as well! This was actually a lot harder than it looks.... I think I need black and white rehab. Or someone to inject a rainbow into my veins... Because, literally it takes so much out of me to not pick out a nice black top. #emoemily


casual, thanksgiving, outfit, idea, ootd, topshop, h&m, scarves, boots, cardigans, fall, winter, cozy,


I think this outfit is soooo comfy and perfect for Thanksgiving. I don't know about your family but my family is so relaxed so this is the kind of outfit I would wear. Its cozy but you still look put together and stylish. I LOVE THAT CARDIGAN.. I know its $80 but listen the top is $13 and the pants are on sale for $9.99... I think that makes up for it right? Lets say the pants were $40 and the top was $23 and then the cardigan was only $40.. I bet you would buy it seeeeeeee. It all equals out at the end of the day. AND Top Shop items literally last a leap year. Im really good at selling things maybe I should be a saleswomen;) AND THAT WATCH. I have never heard of Olivia Burton watches but I have been researching for a while now and am obsessed. She makes the cutest daintiest watches ever. Screw a Michael Kors (Sorry guys) This is more my style! Its so timeless. Haha. See what I did there. Even put on a huge scarf either this one or this one and you are set to go.

I hope you guys have been loving my random outfit posts! Have you picked out your outfit yet? Id love to know what you decide on! Let me know in the comments! AND I HOPE YOU HAVE AN AMAZING THANKSGIVING! Everytime you eat some pumpkin pie or mashed potatoes, think of your girl;)

Friday, November 21, 2014

A Secret for Blondes-- Shh!

Got a secret can I keep it, swear this one you say, got a locket in my pocket taking this one to the graveeee hehehehehe. 
Okay, I don't really know if those are even are the words. But, I couldn't resist. I have a blonde secret and its coming out of the closet. Okay okay okay its not really that big of a secret. The weird thing is, its not a secret at all.... Most blondes just have no idea about my little babe. Actually, most blondes don't even know the difference between blondes which is my biggest pet peeve in the entire world. Am I confusing you yet? Lets back up.....

There once was a thing called blondes. There were many different types of blondes in the forest. But the yellow, brassy blondes were the ones who lived in the straw houses. Ashy, cool blondes lived in the brick houses (per me) because they were the best and of course they would live in the coolest housed away from the bad wolf. The big bad wolf in blondes cases are hard water, the sun, and peroxide. Anytime a dark haired person goes light 9/10 times, the underlying pigment is going to be orange. Which sucks but toning your hair gets rid of that..... For a while. In my case like 2 washes. Not kidding. Then, its back to brassy old Em lookin like a trash bag. UNTIL I FIGURED OUT PURPLE SHAMPOO..... One of my favorite bloggers The Beauty Department also wrote about purple shampoos here! Its an awesome post-- check it out! But, they show the difference amazzzzzingly.

purple, shampoo, purpleshampoo, before, after, brassy, blonde, ashy, hair, amazing, love, beauty, sallys,

Do you see the difference?! Purple shampoo is a shampoo (duh emily) that brightens blondes and keeps them from the Bad Wolf. Ive tried looooads of them and yeah some of them work but nothing like Shimmer Lights. AND GOOD NEWS ITS CHEAP! You can get it at Sallys I think for like $8. Steal! You use it once a week and let me tell you, my hair every time I use this looks like a million bucks. The purple in the shampoo is across in the color wheel from orange so it BITES IT RIGHT IN THE BEHIND! Just remember art class in first grade. This is science guys.. 


I know this was the longest post known to man and I am really sorry. But blondes, have you ever tried purple shampoo? Whats your favorite? Seriously tho, get your hands on this. Your hair will thank you and so will I. Together, we can kick this brass epidemic goodbye and finally put an end to THE BIG BAD WOLF.. 

Thursday, November 20, 2014

Dressy Thanksgiving Outfit Ideeeerzz

I'M SO EXCITED FOR THANKSGIVIN'.
Other than giving tons of thanks and seeing my family, I am so excited for all of the food. Pumpkin pie, some turkey, some mashed potatoes and corn, my grandmas salad, mmmm.... My mouth is watering just thinking about it. Thanksgiving is one of my favvvvvorite holidays. So, since I've been loving polyvore and all, I thought why not make some inspos. As you could probably tell in my last post, I love wearing all black. I just think its so perfect and like I said before you look so put together and honestly like a #GIRLBOSS. Im going to do some casual ideas too and don't worry, I will add some color;)

thankgiving!

cape | dress | socks | boots | purse | lipstick

I looooooove this outfit for so many reasons. First that cape coat ughhhhh! Ive been loving capes ever since I saw T-Swifts Blank Space video. Like can I please have a man on a horse with a cape? I don't know I think its just really classy and I am obsessed. PLUS ITS $25! The only thing I would add is to put on some sheer black stockings if you live in colder climates (like I do) and then pair them with the thicker thigh socks. Wing ya liner and use Macs lipstick in 'Living Legend' and you are all set to eat tons of food. (Ps that dress will be perfect for food babies as well because it is loose like a tshirt dress! You know I think of these things)

_______

Whats your guys favorite part about Thanksgiving? I hope I gave you some ideas! What do you plan on wearing? 
AND HAVE YOU SEEN TAYLOR SWIFTS NEW VIDEOOOO?! Let me know in the comments:)


Monday, November 17, 2014

Review: Tomas Total Tan

I found this sweet little gem because of this post from Maskcara. She has been talking about how amazing this was for aggggggges and I never really understood what the fuss was all about. Until I actually got my hands on it. I use this on soooo many of my clients. It is a god sent.

tomas, selftanner, tanning, acne, dark spots, maskcara, review, amazing, coverup, self tanning, tan,


I know not everyone is into self tanning or tanning in general. This IS NOT the only use. 
If you have acne, or dark spots, OR DARK CIRCLES, this is your cup of tea and you need it. I think she explained it as having a white carpet, and dropping red wine on it. Giiiiirrrl that is never coming out. Don't even try. I wouldn't. Jk. But with a tan carpet, it will be so much less noticeable. (After doing the Vampire Tutorial I dropped the whole thing of fake blood in my new car I had for a week, I know nothing to do with this story, but it was gray seats and I think most of it got out. My luck, kill me, ok Ill stop rambling) But, back to the story, if you have more of a tan your acne or dark circles is going to be easier to cover compared to if you are blankity white. 

I know my pale girls, me included, in order to cover every single spot, you will end up looking soooo cakey when your done because its impossible. This helps bring everything to one color making it a lot less work to cover everything. So you get a flawless, not cakey base. Honestly, go watch her video. I'm going through the same exact things and she explains it so much better!

Also if you've ever tanned or laid out I know this is always my struggle, my face is allllways so much paler than my neck. And when I fake tan I don't spray tan my face because it comes off so easily. So I just spray this on my face before I do my makeup and wait like ten seconds then go on about my day. Or you could have the total opposite problem and your neck be sooo pale. I feel you. This will help you. She says this in her post as well but this is ALOT more natural for that glow rather than piling up on the bronzer. Honestly, in the winter when I just feel way to pale, I spray this on my neck and face because no ones going to see if your bodys pale anyway. And this isn't like going to make you ten shades darker so its obvious. It just gives you this glow. Like helloooo I slept 10 hours, woke up went for a run, showered, ate a nice nutritious breakfast, all before 10 am. Yeah that never happens to me either.

BY THE WAY-- This isn't a typical self tanner. It washes off in the shower. Like you still have a little tint. Its not like if you are in the rain this would run off your face. But, its not permanent. 

Really, this is a life changer. You can get it at Sallys for $15 and that can will last you a coons age. 

Whats your favorite way to cover your acne and dark spots? Do you have any cool tricks? Also, do you spray tan? Whats your favorite? 

Thursday, November 13, 2014

FALL MAKEUP TUTORIAL-- INSPIRED BY KYLIE JENNER

kylie jenner, eyes, lips, kylie jenner lips, kylie jenner makeup, fall, fall makeup, fall makeup tutorial, makeup tutorial, easy,

HI!
I'm back with another makeup tutorial.. This ones inspired by KYLIE JENNER. Okay, this may be controversial, its okay if you don't like her. But, she's brought makeup into a whole nother category. Not even kidding. She started bringing the 90s makeup back and I am not complaining. I LOVE THE DARK NUDE LIP TREND-- BRING IT ON! You can't deny that this simple natural makeup look is beautiful. It is all about the lashes and big lips because, who doesn't love that?!

First, start out with my contouring and highlighting routine. You can find that here. Don't forget this step! A flawless base is what makes this makeup look so beautiful! 
kylie jenner, eyes, lips, kylie jenner lips, kylie jenner makeup, fall, fall makeup, fall makeup tutorial, makeup tutorial, easy,
Now onto the eyes--- ALWAYS START OFF WITH A PRIMER! Then, I took Nectar from my Lorac Pro 2 Palette and swept that with a big fluffy brush into the crease, making sure there is no hard lines. This is our transition color. Afterwards we took Buff from the same palette all over the lid and blend again. Then we switched over to our Maya Mia Palette and took the color Caramel and put that into the crease, again in back and forth motions and blend blend blend.
kylie jenner, eyes, lips, kylie jenner lips, kylie jenner makeup, fall, fall makeup, fall makeup tutorial, makeup tutorial, easy,
I took Caramel again under the lower lash line to smoke it out a bit and took Vanilla from the same palette on the inner corner and right on the brow bone. Now time for the winged liner! No Kylie look is complete without this!
kylie jenner, eyes, lips, kylie jenner lips, kylie jenner makeup, fall, fall makeup, fall makeup tutorial, makeup tutorial, easy,
Now. coat your eyelashes with some mascara. Kylie always wears falsies so I took Ardell Demi-Wispies (If you would like a tutorial on how to put on falsies let me know!) Then for that more wispy affect we took some small individuals and put them right in the inner lash line. 
kylie jenner, eyes, lips, kylie jenner lips, kylie jenner makeup, fall, fall makeup, fall makeup tutorial, makeup tutorial, easy,
FINALLY FOR THE INFAMOUS KYLIE LIP! I found this lip liner from the drugstore and it was literally a complete dupe! Its Rimmel Londons Tiramisu! I am obsessssssssed. I wish I could put the heart face emoji right now. Line your lips like you normally would then fill them all in. And you're finished!

kylie jenner, eyes, lips, kylie jenner lips, kylie jenner makeup, fall, fall makeup, fall makeup tutorial, makeup tutorial, easy,  
kylie jenner, eyes, lips, kylie jenner lips, kylie jenner makeup, fall, fall makeup, fall makeup tutorial, makeup tutorial, easy,
I hoped you guys loved it! Whats your favorite makeup trend this Fall? Are you into the 90s trend coming back?
__

A big thank you to Sarah Bedzyk for all of the photos! She was aamaaaaazing!
You can check her website out here.
And give her a huge thumbs on on Facebook. Tell her I sent ya;)
Talk to you guys soon!

Sunday, November 9, 2014

Secret to Fixing Your Dry Hair!

Even if I'm a hairdresser, I have hair issues too.
I know, who woulda thought right? But honestly. Ever since I went blonde and was a little brat about it and wanted to lighten my hair 6 times in one week even though I knew the consequences-- my hair is judging me hardcore. I have tried EVERYTHING to get my hair back to normal. Deep conditioners on deep conditioners on deep conditioners. Nothings helped. All the deep conditioner actually gave me product build up like noooooo tomorrow. So my hair just felt gunky like I had gel and conditioner left in my hair then straightened it. EW. So on a random Sunday I tried this Pinterest bologna as a DIY Clarifying Shampoo because I didn't have any on hand and that made my hair so much worse. I couldnt even blowdry it. It felt like mash potatoes. So thats my life story and fail of the month. Ive dealt with the crappiest, grossest, deadest (ya thats not a word) hair ever.

UNTIL TWO DAYS AGO....
dun dun dun dun.


I got these bad boys.
They literally are a godsend.

Per the Matrix website:
Formulated with Arginine and Soy, Biolage Advanced repairinside Shampoo cleanses and conditions severely damaged hair to help restore suppleness and shine.

•Gently cleanses

•Repairs damage
•Restores suppleness and shine
Yahhhhhh it does! I'm not kidding when I say if you have damaged hair and thought "Oh I just need to cut my hair I have no other choice". You're wrong. Go buy this. NOW. I don't know what to tell you except its amazing. My hair feels so soft. I can actually run my fingers through it (before I couldn't to many tanglez) It feels normal. My little cousin even noticed and she's 10... 
Honestly, if you suffer with dry hair, take my word. Go buy this shizzzz. It will change your life..
Whats your favorite dry hair remedy? Does anything help you?! Let me know in the comments-- Talk to you soon:)


Tuesday, October 28, 2014

DIY: BLACK SWAN


HIIIIII
for my last Halloween DIY I thought why not do the Black Swan.
Natalie Portman is legit in that movie. Like that and that other movie with Ashton Kutcher came out around the same time and I remember looooooving her in that then seeing Black Swan and thinking, what in the world. Of all worlds. Is going on. Am i the only one? If you haven't watched it go check it out. The makeup in this movie is soooo DOPE and I thought why not put my own twist on it? I think this is such a cute costume to rock with a black ballerina tank and a black tutu. You'd look like a babe. Bet ya!


First thing we did is take the lightest foundation in Loreal True Match and apply it all over the face and down the neck. Then take a white translucent powder and don't tap off the excess and just pat it all over the skin. This is what really gives that white creepy base.

Then, start contouring with a gray shadow. Really accentuate this, the more you contour the creepier you'll look and thats all cooool for Halloween. Skip the blush and for a highlight I actually took Macs Pigment in White. I wet my brush with Fix+ and put it under the eyes, down the bridge of the nose, the cupids bow, the chin, etc etc. 

Now for the eyes--
We took any black shadow and put it all over the lid as a base. Then with eyelash glue pat it on the skin where you want the feathers, wait like ten seconds so it gets tacky, then apply them where you seem fitting. Then we took hairspray and just sprayed where we wanted the feathers to stay. They were going everyyyywhere, their nuts. Finished it off with some black liner, and smudged it all out with a shadow.

To finish off the look, I took a matte red lipstick (Russian Red from Mac) and applied that, then took Night Moth, a dark lipliner and put in the inside to make it look extra creepy.
AND BAM you're done. Go put your tutu on and call it a day hehe!

If you recreate any of these looks for Halloween I would love to see them!
This is unfortunately my last tutorial. Halloween came to fast. But, be safe and don't do anything I wouldn't do ;) AND HAVE FUN!

Talk to you soon xx

Thursday, October 23, 2014

My Drugstore Holy Grailzzz


Hi, I really miss just chatting on here. Am I pathetic? Maybe I need some friends haha.
But, I like you guys. I feel like when Im shopping I go home and think, oh my lanta I got to go blog about all the cool things I found. Like its ridiculous. Haha, its like you guys are my friends and I just have to tell you everything I bought.. This sounds sad, but, its the trufffth. When I'm doing tutorials I just feel like its straight to the point and dry. Like, blend, put on lipstick BYE. So lets actually get back to normal and be BFFz again? Ok, good. Thanks.

So I'm gonna talk about something close to my heart and apparently your guys too.
Drugstore Products.
Where do you draw the line? What should you splurge on?
Honestly, heres my say, I don't draw the line anywhere. I don't think you exactly need to splurge on anything. Thats my opinion others may be different but, I like to try everything. Some drugstore products yes, for lack of a better word, the pits. But honestly, so are some high end Dior things. Im not against anything. But, don't get me wrong, I do love high end things, as you may see in my tutorials. On the other hand tho, I do love me a good NYC find. You do you, if something works for you and its a dollar. GIRRRL YAAAASSS. Im jealous and let me in on it. But like I said, I'm here to try everything from drugstore to high end for you to see what you need to go out and buy right now or pass on. So lets get to it.


NYC Liquid Liner-- Ummmmmmmmmmmmmm. I'm obsessed. If you follow a lot of bloggers, or you tubers you may already have heard the rave about this. But, its literally one of the blackest eyeliners I've ever used. The applicator is also amazing. Its super easy to work with and lasts forever. Wait for it.... Its also only $2.99. You should go buy it if you're obsessed with a nice wing like me.

Keepin on the NYC train, their Sunny Bronzer... I've talked about this a hundred and one times. But, one more won't hurt. This is a perfect bronzer. I literally reach for it more than I do my high end ones. I love it. There is no shimmer and it literally mimics a real tan. It gives you some color without looking Jersey Shore-esq if you're picking up what I'm putting down. This is also $2.99 ughhhhh. Its almost a complete dupe for Benefits Hoola Bronzer if you're into that but for a fraction (not even) of the cost.

Rimmels Lash Accelerator Mascara! This gem is like $7.99 I think... This is an amazing mascara. It lengthens like no other. Im obsessed with this one mascara from Mac, I think its called Extended Play and this is exactly like it, if not better. Its a miracle worker for my bottom lashes. When I wear this its like BAM there they are. I LOVE IT. I would pick this over a lot of high end mascara. Oh, and it lasts a super long time too. I wore it to bed (I know bad) on accident and I woke up and my lashes still were like Hayyyyyyy.

Revlons lipsticks, lipglosses, lipstains. Anything Revlon lip wise. Im about.  They are soooo pigmented and last a good amount of time for being $4. Their lipsticks after Mac and YSL are my favorite lipsticks of all time. They have the most PERFECT nudes and fall colors. No other drugstore lipstick touches Revlons. My favorite is Pink Pout and Nude Attitude. Im not kidding I reach for these two more than any of my other lipsticks 75% of the time. And thats a big deal considering the amount of lip sticks I do have. I have loved these for yeaaaaaaars. My first ever lipstick I actually wore on a daily basis was Nude Attitude and I have repurchased it at least 10 times.

Loreal Viable Lift Blur Foundation & Loreal True Match
This stuff is amazing. I got it because honestly, I was like I love my Loreal True Match, its my favorite foundation, so why not try it? And I'm so glad I did. It literally blurs my pores, blurs every imperfection and it doesn't feel heavy on the skin. Which is a plus! I loveeeee it. Its awesome for everyday! Loreal True Match is more for a night out. Its full coverage and you can definitely tell you have foundation on. But, it makes you look flawless. Its great for people with problem skin that wants a foundation to really cover everything. I use this on clients alllll zeeeee time. I love it.

NYX anything, practically is bomb.
I love their blushes, their concealers, their lip glosses.
Their lip butter glosses are everything. And they smell like vanilla. What else do you need in life? Their staying power isn't that great but if you're ok with reapplying its beautiful when its on and moisturizes your lips like no ones business. My favorite is creme brûlée! You can get them at Ulta for like $5.

----
So theres that....
You have all my secrets to cheap deals.
You're welcome ;)

Talk to you guys soon!


Sunday, October 19, 2014

DIY: Mermaid Tutorial! MOSTLY DRUGSTORE!


Hiiiiiiiiii everyone, I'm back with another HALLOWWEEEEEEEN tutorial. 
This time a MERMAID.
Ok, like vampires, I am obsessed with mermaids. I want to be one.
Im actually pretty obsessed with Carli Bybel a you tuber and I got inspiration from one of her videos a few Halloweens back and I alwayyyyyyyys wanted to try it out so I thought leeeegggoooooooo.
So Halloween gives you the chance to do this! Its super cool and easy, but pretty and not scary;)
And its actually pretty cheap to do by yourself at home!
If you're interested how to get this look, keep on reeeadin


First things first we did our foundation/contour routine which you can find here!

For eyes we primed of course with any eye primer. 
Then took Maybellines Color Tattoo in Tenacious Teal and patted that on the outer corner of the eye and inner. Leaving the middle with no shadow. Then we took Urban Decays Grifter or any light purple and patted that right in the middle where we left it bare and blended it all out with a clean blending brush making sure theres no harsh lines! Then to intensify the teal we took our Mac Fix+ (or if you read this post you may know you can replace this with eye drops) and sprayed our brush and then picked up Maybellines Tattoo Pure Pigment in Never Fade Jade and patted it right over the teal and blend it all out with a blending brush again. Then taking the teal we lined the underneath of the eyes and afterwards took NYX Jumbo Pencil in Purple Velvet and lined our waterline and took any white shimmery shadow and just highlight the inner corner and brow bone. Then BLEND everything out one more time!

NOW FOR THE FUN PART:
Take some fishnet stockings and place it where you would want the scales and then take the Maybelline Tattoo in Tenacious Teal and start patting in random places, again to intensify it take Never Fade Jade then take the light Purple shade and start patting that on the outer edges of where you want your scales to end. To really get a gradient effect, take the shimmery white shadow and go right at the edge. Just to make it look faded to nothing. If ya know what I'm sayin... This part you have to really make sure you don't move the stocking unless the scales will move. Then we took some eyelash glue and put it on the back of our hand and waited a few minutes so it will get tacky. We placed it wherever we wanted the glitter (I got the glitter and sequins at Jo Ann Fabrics for literally $3) and then took the glitter and sequins where ever we thought would look good. And voilllaaaaaa finished with some Pink Lipstick and you're set!

Now you're the prettiest mermaid in the whhooooleeee worrrrld;)
Keep checkin by for some new Halloween Looks! See ya lata alligata or should I say mermaid?


Wednesday, October 15, 2014

Extreme Makeover Mom Edition: Part 2


OKKKIEEEE so guess who's finally back with Part 2!
Yeah I know, Im pretty late, but, I've been busy. Im sawwryyy.
If you haven't seen Part 1 go check it out here!


So lets get back to Caitlyn! 
I wanted to do something very quick and easy on her since she's a mom of about to be two! I know not all mothers have the time to do this every single morning so just take little bits of pieces of what I did and incorporate it into you're everyday routine.

First, I of course did my contouring and highlighting! (This is optional but honestly, this makes all the difference) If you get it down, it will take you an extra five minutes.
I used Urban Decays Sin all over her lid, then took Nectar and Light Brown from the Lorac Pro Palette 2 in her crease to define a bit. I took Sin under the bottom lashes and finished it off with a nude liner and mascara! I filled in her brows with Taupe Dipbrow by Anastasia. I swear if you just did the contouring and highlighting, your brows, mascara, and lipgloss you would be good. I swear by good brows. It makes ALL of the difference. I finished off the look with Angel by Mac with Buxoms White Russian lipgloss!

For her hair, we curled it with a wand and put it upside down, ran our fingers through it and scrunched with Paul Mitchells Sea Salt Spray!

And VOILA!
This really is easy.
Maybe not the first time.
Or the second.
But the third time you will be a pro.
It will take ten minutes at most!

___
All you moms try this out. I want to see some before and after pics!
See you guys soon with some more Halloween Tutorials AHHHHH


Monday, October 6, 2014

Extreme Makeover: Mom Edition!


Hiiii Ladeeeez!
One day, I was ya know just hangin' out, not really sure doing what and got to thinking, most women honestly just don't know what they are doing when it comes to makeup. They have been doing the same thing thinking that it is fine for years! They don't understand that their is other ways to do makeup. From mothers, to highschoolers, to grandmas! I remember when I was in high school I thought it was the cooooolest thing to wear bronzer and black eyeliner.. Thats it. I thought I was SOOOOOO cute. I know a lot of time with mothers they think they just don't have the time. But believe me, makeup can be fast and cute! There is no excuses girlfriend! With your hair as well! Like I said tho, when I was in high school I thought I was all that and a bag of chips. You could not tell me that something would look better. Sooooooo I decided why not do a post and show before with no makeup, what they do on an everyday basis and then my version! That way, you can really see how much of a difference hair and makeup makes! Not that any of these girls I am using really need a makeover because they are all beautiful no matter what. But, just a little somethin fun!

My first edition is going to be: The Everyday Mom
The mom who doesn't really have time to do much, but wants to look put together.
So I picked Caitlyn! 

Caitlyn is a mom to a two year old, Ava and is also expecting a baby boy in a few weeks!


Can we please talk about Avas big blue eyes?!?!?! Caitlyn is very simple and naturally beautiful. So, when I had her in my chair I thought, why not glam her up a little bit?! Even though I wanted her still to shine through with her beautiful pregnancy glow! I sat down with this mom and we went through her normal makeup routine. She says that when she does wear makeup, she uses Johnsons Baby Lotion, Bare Minerals foundation and bronzer. Then Bare Minerals mascara and some chapstick. Simple simple simple!

_______________
You can still be glam on a budget, and on a time schedule. Check back on Wednesday to see what I decided to do and learn some tips and tricks!

Tuesday, September 30, 2014

Dark Lip and Simple Eye


Hiiiiii everyyyone!
As you may found out in my Fall Fashion blogpost..  I am obsessed with Fall. Not only Fall clothes, but Fall makeup IS BOMB. Everything about a dark cranberry lip I am all up, all over and around. Since I am mildly obsessed-- who am I kidding, I am totally obsessed-- I thought WHY NOT DO A TUTORIAL?!? My favorite quick out the door look lately has literally been a winged winer, bold lip and thats about it. Takes .5 seconds and you literally look like Miss Fashionista. Try it. I bet you will get a million and twenty compliments! ;) Now lets get into this...


HOW TO DO ZISSS:
- For the base (foundation, contour, blush, highlight) check out my previous post!
- I know I get repetitive but ALWAYS PRIME YO LIDS. Unless its literally going to be a waste of time and you're eyeshadow/liner will come off halfway through the day.
- Then you don't want to do anything crazy to the lids since you have that dramatic lip going on, I just swept a light brown shadow into the crease for some definition and such!
- After that, I took a white eyeshadow and put that in the tear duct and right underneath the brow to highlight and make ya look awake.
- Then I did a winged liner. Find out how I do that here! (btw-- would you like a picture or video tutorial on this? let me know in the comments!)
- Now onto the lips! I took Macs lip pencil in Night Moth and lined the lips and brought it half way down the lip so it blends with the lipstick seamlessly and then, apparently finally put some Mascara on..... Hahahhaahahha
- Lastly, I took Macs lipstick Cyber and filled in the rest! Rubbed the lips together and dadadatada! A perfect Autumn Look!


So there it is! The most simple and easy Fall Makeup! 
How cute would this be with a grey cozy cardigan and some boyfriend jeans?!! UGHHH TO DIE FOR. 


Let me know what other Fall Makeup Looks you want to see nextttt!
Keep your lids open for some Halloweeeeeeeeeen Tutorials 0:)


Thursday, September 25, 2014

HOW TO CONTOUR LIKE A BOSS PT 2


Hiiii guuuuuys. I'm back again with a new post. But, this time not so new. I posted wayyyyyyy back when my essential makeup step which is Contouring and Highlighting. Check that out here. Since that post has blew the heck up I thought, why not do an updated one? Thats oooold news. Still check that post out though, because the technique is still the same, just the products are different. I think these products make allllllll the difference. So lets get started :)


Heres an exerpt from the 1st post---

"This is my girl Kim K... As you all know I'm obsessed but we can save that to talk about for a different day.... She has the perfect cheekbones, the tiniest nose, the best jawline....... Are you not so jealous?!? Well, I have got great news for you.. You can have it too! Noooooo I'm not talking plastic surgery.. With makeup! Its called contouring and highlighting! For all of us that weren't born with those perfect features this is for you... Contouring is when you take darker colors to create a shadow to take away the look of an imperfection you might want to cover up and you highlight the places of your face you really want to stand out! I can swear on Lolas life everyone in the magazines, red carpet anything are not so perfect-- they use this technique!"
I still think thats an amaziiiiiin explanation of contouring soooo why fix it if its not broke. Ya hurd?

What do I use?
Any matte brozer (no shimmer) two shades darker than your regular skin tone, A concelear to shades lighter than your skin tone, A setting powder, blush, highlight.

Enough talkin about it, lets be about it:
- Prime, prime, prime yo skin.
- Start out by taking your favorite foundation with a Beauty Blender all over dee faceee.
- Then, take any concealer, my favorite is Mac Prolong Wear, and do triangles under each eye, down the bridge of your nose, alittle on your forehead, your cupids bow, and your chin. Blend that in with the tip of the beauty blender.
- At this point, set everything with a powder. After all liquids are finished you always want to set it by pressing the powder into your skin. This keeps you looking matte and for the foundation/concealer to last. So, under the eyes I use Anastasia Beverly Hills powder from her contour kit in Bannana, this is a yellow based powder, so it will really brighten up your under eyes and help it from not creasing. Then, I take a translucent powder and set that all over the rest of the face.

 - Take my holy grail, NARS ITA BRUSH, dajkdjakd, with Fawn, from the contour kit, and make a fish face-- I swear I am not crazy-- go right where it sucks in to start contouring under your cheekbone. Blend that all out, then take it up your forehead, down each side of your nose, and the jawline. Dont forget to blend, blend, blend.

- Use your favorite blush.
- Highlight with any highlighter, my favorite is Stilas Kitten Duo, on the tops of your cheekbones all the way above your brow in a c-shape. Alittle on the tip of your nose, then your cupids bow, and chin. This helps really highlight the areas that the light would normally hit.
- Finish your makeup and BAM. Kim K status.


Highlighting & Contouring tips and tricks:
Say, maybe, you dont like youre forehead, its way to big, take the contour shade, and shade the top and sides of your forehead pretty low, then, highlight as little as possible. Say, youre forehead is to small, dont contour as much and really bring that highlight up.

Now girl if you got a broad nose, you need to contour that big time, you can make your nose legit look like you got plastic surgery not kidding. Maybe I should do a post all about that--- let me know in the comments if youre interested-- But, if you have a broader nose, take the contour shade and make two lines very slim and narrow then highlight a very thin line down the nose and blenddddd.. This will mimic a tiny nose.

If you have a double chin, like I think I do sometimes, contour your jawline and bring it down this will make a shadow that will kick that double chin right in the behind.

I hope this helped everyone! Ill be back in a few days with a Fall Makeup Tutorial! Keep on the lookoutttt 0 o
FLOWERS IN EMILYS HAIR. All rights reserved.
Blog design by Labinastudio.